With Google Pay, customers can make payments using credit or debit cards stored in their Google account and experience a simpler and faster checkout process.
When a customer pays with Google Pay in apps and on websites, Google Pay shows a payment sheet where they select their preferred card payment method and confirm their purchase.
By integrating Google Pay, you agree to Google’s terms of service in your Merchant Portal provided by EveryPay.
Every Pay available integration methods
EveryPay integration supports Mastercard and Visa networks and offers the following options:
- Hosted page solution – the simplest way to accept Google Pay payments, suitable for merchants that are using our hosted payment page to display available payment methods for the customers
- Web SDK – additional integration needed, customizable, suitable for merchants that are using a custom checkout page in their E-shop to display available payment methods for the customers
Hosted page solution
Initiate payment calling /oneoff API endpoint and redirect to the general “payment_link” without payment method specific “method_source” parameter. Payment will be processed on the EveryPay payment page, displaying the Google Pay button and payment sheet when using a Google Pay compatible device. No additional configurations are required to use Google Pay on EveryPay hosted page. To enable Google Pay, please contact Your Acquirer and read Preparations for Hosted page solution.
* Please note that payment tokenization (“request_token=true”, “token_agreement=recurring/unscheduled”) and checkup payments (zero amount) are not currently supported for Google Pay. In case of such payments, the Google Pay button will not be shown.

Preparations for Hosted page solution
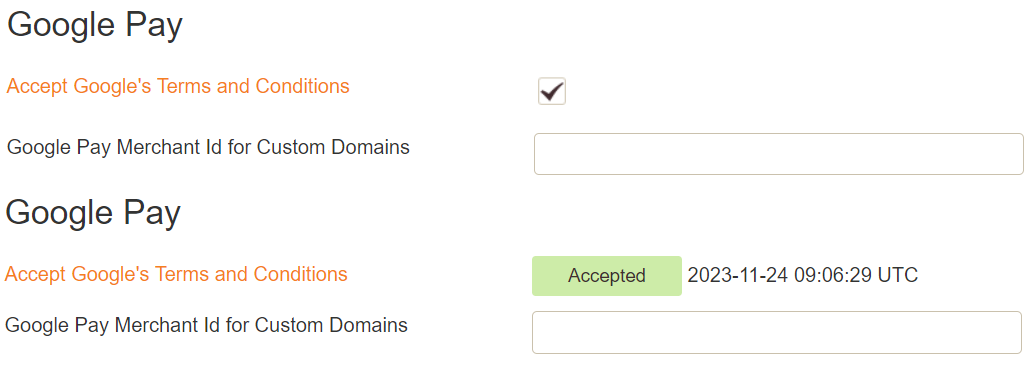
- From your Merchant portal, go to E-shop Settings
- Choose the right E-shop and go to Google Pay section at the bottom of the page
- Read and confirm Google Pay Terms and Conditions by clicking the checkbox and pressing “Save”
- In the Google Pay section, there should be: “Accepted” with the date & time
- Leave “Google Pay Merchant ID for Custom Domains” field empty for Hosted page solution
Web SDK
It is possible to accept Google Pay payments on your E-shop checkout page using EveryPay Web SDK. Note that to accept Google Pay payment on the Web, you need to serve from an HTTPS webpage with a TLS domain-validated certificate.
Preparations for Web SDK
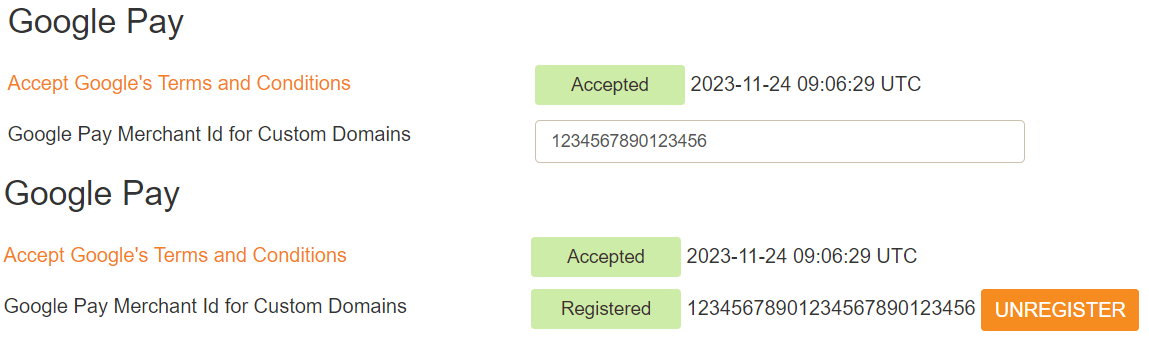
- To accept Google Pay payments, you must register with Google and receive a Merchant ID, adding the necessary information in Google Pay API section via Google Pay and Wallet Console
- From your Merchant portal, go to E-shop Settings
- Choose the right E-shop and go to Google Pay section at the bottom of the page
- Read and confirm Google Pay Terms and Conditions by clicking the checkbox
- In the “Google Pay Merchant ID for Custom Domains” field enter the Google Merchant ID obtained from the Google Pay and Wallet Console and press “Save” (in the test environment, a random value can be entered)
- In the Google Pay section, there should be: “Registered” with Google Pay Merchant ID and the option to “Unregister”
To initiate a Google Pay payment in the test environment, just add a genuine card to your Google Wallet. You can relax knowing that no funds will be deducted, as a red notification will inform you – Your payment method won’t be charged because you’re in a test environment.
Integration overview
- Include the Library
Include the EveryPay JS library by adding this script tag to your page. This is a light JavaScript wrapper over the Google API provided by EveryPay. We suggest including the library directly from the URL below and not bundling or hosting it from custom locations so that updates can be done dynamically:
<script src="https://pay.every-pay.eu/google_pay/google-pay-client-1.4.js"></script>
- Add HTML container
Add the HTML container where you want to display the Google Pay button:
<div id="google-pay-container"></div>
- Initialize the Web SDK
Possible values for testEnv: true/false (test environment: true, production environment: false, allows adding a Google Pay button without the need for a /oneoff request at this stage):
// Initialize the Web SDK
var googlePayClient = GooglePayClient.initialize({ testEnv: true });
- Prepare a function
initPayment() that triggers E-shop server to make a /oneoff request with an additional parameter mobile_payment: true
- Prepare a
handleResult() function that configures Google Pay client with payment details received from the /oneoff request response
- Prepare a
googlePayClicked() function that calls the initPayment() and handleResult() to configure the Google Pay client
- Display the Google Pay button, setting the
onClick event handler
Example:
<html>
<head>
<meta charset="UTF-8" />
<script src="https://pay.every-pay.eu/google_pay/google-pay-client-1.4.js"></script>
</head>
<body>
<div id="google-pay-container">
<script>
// Initialize the Web SDK
const googlePayClient = GooglePayClient.initialize({ testEnv: true })
googlePayClient.addGooglePayButton({
buttonColor: 'default',
buttonType: 'plain',
buttonSizeMode: 'fill',
onClick: googlePayClicked,
})
async function googlePayClicked() {
// Initialise the payment and retrieve the response data
const data = await initPayment()
// Pass data to the handleResponse function to configure Google Pay client
handleResponse(data)
// Display the Google Pay payment sheet
googlePayClient.createGooglePayPayment()
}
async function initPayment() {
// Send a request to the server endpoint with the amount as a query parameter
const response = await fetch(`https://example.com/init_payment`, {
method: 'post',
headers: {
'content-type': 'application/json',
},
})
if (response.ok) {
return response.json();
} else {
throw new Error('Invalid response from server');
}
}
// Function to handle the response data
function handleResponse({ responseData }) {
// Create responseParams object using const
const responseParams = {
access_token: responseData.mobile_access_token,
api_username: responseData.api_username,
account_name: responseData.account_name,
payment_reference: responseData.payment_reference,
country_code: responseData.descriptor_country,
currency_code: responseData.currency,
payment_link: responseData.payment_link,
amount: `${responseData.initial_amount}`,
}
googlePayClient.configure(responseParams)
}
</script>
</div>
</body>
</html>
To ensure the proper display of the Google Pay button on your website, refer to the Google Branding Guidelines for comprehensive instructions on customization and branding.
Congratulations! You have successfully completed the integration steps! You can now test your Google Pay implementation in the Google Pay Sandbox environment using the test card details provided.
For details, see the Google Pay Integration Testing topic.
Compatibility
For more information on Google Pay availability, refer to:
Google Pay offers two card authentication methods:
- PAN_ONLY – associated with payment cards stored on file that may require 3D Secure to comply with SCA requirements
- CRYPTOGRAM_3DS – associated with cards stored as Android device tokens – this method is SCA compliant and does not require 3D Secure to be processed