Creating a template
In order to send LinkPay links to customers to pay it is necessary to define a set of payment details to be associated with the link. In order to do so, it is reasonable to create a LinkPay Template first. Creating a Template is optional, however, LinkPay Template is a useful feature allowing to define one generic model per a specific use-case with required and custom fields as well as to give the check-out page the desired design. All this info saved as a Template can be further used as a framework for several different links that hold the same scenario but might just require different language on the checkout page or some different currency for example.
Template principles
- Template allows to define all the fields that should be visible for the customer, and also define whether the field can be changed or filled in by the customer while making the payment.
- Additionally to standard fields like company name, transaction amount, invoice number or customer data also any other information can be added as read-only or asked from customer to fill in on custom fields.
- order reference field can be pre-filled by the merchant to link the payment with the order data in its system. If not defined, the reference will be automatically generated by EveryPay system. The order reference value will be presented also on receipt displayed (and mailed) to customer.
- Field name and language can be set by the Merchant that best fits its use-case. The defined language will be used on LinkPay page footer, on the payment page and for displaying the error message if needed and to compose a receipt for the customer.
- To get the LinkPay form to have a visual design more natural to Merchant brand a company’s logo or banner can be used on the LinkPay page. Supported files are: jpg, jpeg, png, gif.
- A custom text on the Button can be used if needed.
- Required field indicates whether the field is mandatory to be filled in by customer or not.
Creating a link
- after having designed a Template you can now create the specific link using the Template data defined beforehand. Go to LINKPAY -> Links -> ADD LINK
- define a Link name
- choose template dropdown gives you the list of previously created templates
- define the Processing account to indicate the currency you want the payments to be processed with
- the values defined within Template can be overwritten if needed
- any changes made on Link attributes or settings does not affect data defined on Template
Additionally, a new Link can be created also by itself, without using any predefined Templates. The logic and fields for creating the Link are the same as when creating the Template.
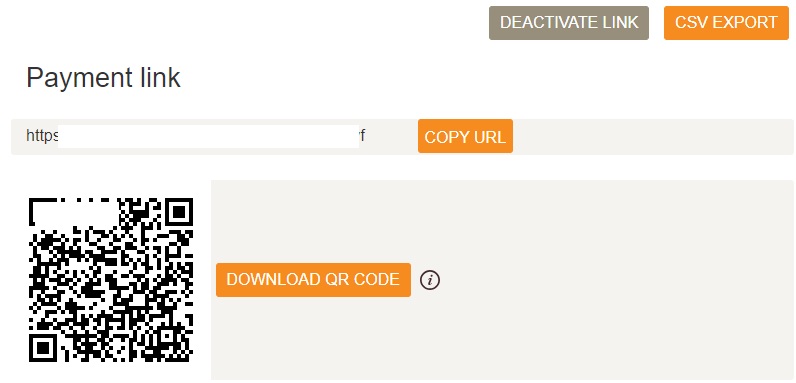
LINKPAY (1) -> Links -> ADD LINK (2) -> Add the amount and fill in desired fields -> SAVE (up right side) (3) -> After opening created LinkPay link click on COPY URL or DOWNLOAD QR-CODE (4) -> Provide URL or QR-Code for your customer.
1.

2.
3.
4.
Columns:
ENABLED – enable/disable parameters
REQUIRED – mandatory field, if it is not filled in then this validation will net let it to go through
CUSTOM FIELD LABEL – field name, you can rename it according to your needs
CUSTOMER CHANEABLE – the customer is allowed to change the value of the field
URL CHANGEABLE – used in case of Custom LinkPay (pre-filled fields) solution
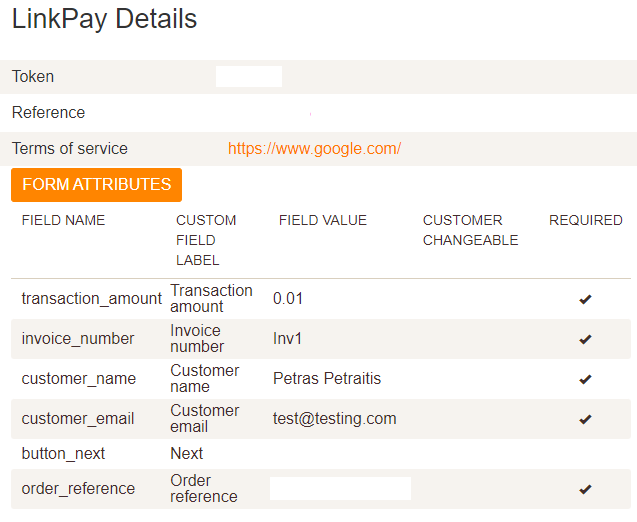
transaction_amout – amount
reference_number – structured reference is used to associate the customer with the payment value that must be compliant with the ISO11649 Creditor Reference standard.
invoice_number – invoice number
customer_ name – customer name
customer_ email – customer email address (field validation, if it is not an email address then the customer can not continue). If this field is used a payment confirmation email is sent to the customer_email.
custom_field_1; custom_field_2; custom_field_3; custom_field_4 – used for additional information, you can rename it according to your needs
order_reference – order number (Order ID). If you leave this field empty, then order_reference will be generated automatically.
N.B.
-
For order_reference these characters are allowed a-z A-Z 0-9 / – ? : ( ) . ,‘ + space
To be precise, these are allowed characters:
a b c d e f g h i j k l m n o p q r s t u v w x y z
A B C D E F G H I J K L M N O P Q R S T U V W X Y Z
0 1 2 3 4 5 6 7 8 9
/ – ? : ( ) . , ‘ + [space]
-
If you are using custom order_reference, validation may not allow to pay a payment with the same order_reference which was already paid before → In such case use every time unique order_reference, or you can disable this validation in the E-Shop Settings (remove checkbox, click SAVE):
UPLOAD NEW LOGO – LinkPay payment link can have your uploaded logo
LinkPay payment information
When LinkPay link is created you can download link information in CSV format (CSV EXPORT) – data will have information about all initiated payments via this link.
Open LinkPay payment in the portal > Click on FORM ATTRIBUTES
LinkPay payment link expiration
LinkPay link expires:
- after the payment count is set
- when expires at the selected date (DD/MM/YYYY HH/MM). If it is not set, the link status remains Active.
Customer redirect to Customer URL
When the Customer URL value is set in LinkPay settings, the customer gets automatically redirected to a specific URL when the payment is processed successfully. If the Customer URL field is not used, then the customer will be redirected to EveryPay Hosted landing page which displays the payment status and other information.
For the correct payment flow please rely on the “payment_reference” parameter which is received in the Callback, (set it up in the portal E-Shop Settings).
LinkPay Callback information: https://support.every-pay.com/merchant-support/integrate-linkpay-callbacks/
Creating Terms of Service for LinkPay
A Terms of Service message can be created:
- Go to LINKPAY -> Terms of service
A Terms of Service is the agreement that includes the terms, the rules and the guidelines of acceptable behaviour and other useful sections to which customer must agree in order to use or access Merchant website.
In order to create Terms of Service Agreement the following fields must be specified:
- Title (mandatory)
- External url – https://example.com
- Content- maximum 5000 characters
To create a Terms of Service Agreement Merchant can use:
- external URL or
- Content or
- external URL and Content
Please note customer needs to check the checkbox on the payment page before continuing to the checkout. If a customer doesn’t check the checkbox before clicking the checkout button, an error message will prevent them from continuing.
How to enable subscriptions for LinkPay?
LinkPay links can be tied to multiple Subscription Plans and Plans can have multiple Links (e.g. multi-language links for the same Plan).
The link language is stored together with the Subscription data, so that future communication with the user continues in correct language.
Creating a Link for Subscription is similar to creating a regular Link or Template, except one or more of the Subscriptions Plans must be selected from the dropdown.
To create a Subscription Link:
- Enable Subscription link checkbox (if not already pre-selected with the
template).
- Pick one or more of the Subscription plans in the link creation/editing view, if it is not already preset by the template. The selected plan can be changed later
– this will affect only new subscriptions created through this link, all existing subscriptions will continue to use the Plan they were created with.
- Fields ‘Customer name’ and ‘Customer email’ must be always present for Subscription Links. This data is needed in order to tie the Plan to a Customer. The information can be viewed in Portal on Customers and Subscriptions page.
- Other fields can be defined as needed.
The created Subscription payment link allows the customer to sign up for the service and/or make the initial payment. Following payments are then initiated automatically by EveryPay system using the schedule and amount described in the Plan.
Custom LinkPay integration
Documentation: https://support.every-pay.com/merchant-support/prefilled-linkpay-link/
Generate payment link -> Enable URL changeable -> Use the code from the documentation -> Create your custom LinkPay payment links with your parameters (e.g. parameters from your accounting system).
LinkPay pre-filled is a custom solution, as an alternative you could create payment links every time via the portal manually.
LinkPay Callback: https://support.every-pay.com/merchant-support/integrate-linkpay-callbacks/